Table of Contents
In this article you’ll learn, how to make Arduino UNO Distance Project with Ultrasonic Sensor HC-SR04 to calculate distance between Ultra Sonic HC-SR04 device and an object
In this project, we will use a Processing app to display the distance between Ultra Sonic device and object on the Laptop’s (Monitor) screen.
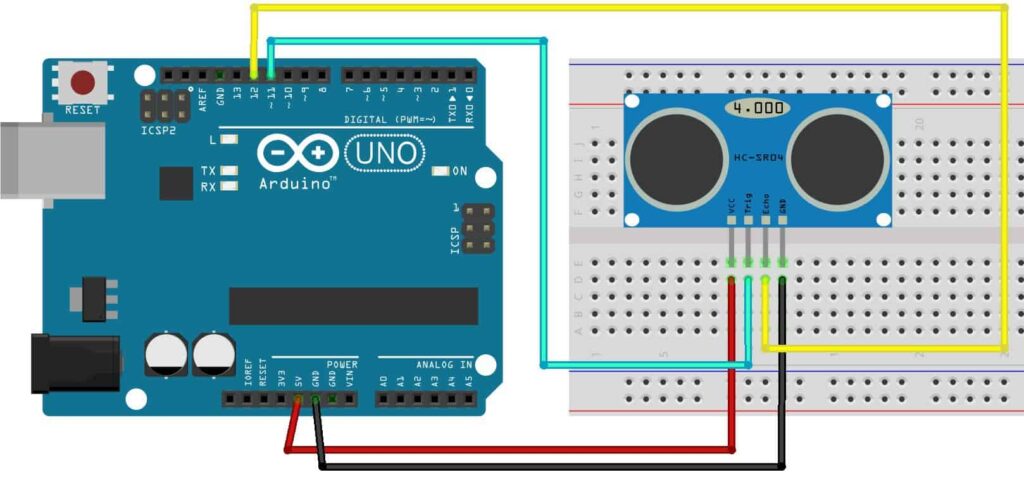
Circuit Diagram

Resources required
- 1 Arduino Uno
- 1 Ultrasonic sensor (HC-SR04)
- 1 Breadboard
- 4 male to male jumper wires
Procedure
- Mount the sensor anywhere on the breadboard
- Connect the GND of sensor to the GND of Arduino
- Connect the trig pin of the sensor to pin number 11 as shown above.
- Connect the VCC pin to the 5V of Arduino
- Connect the Echo pin to pin number 12 of Arduino.
- Finished, so simple na !
The working principle of Ultra Sonic HC-SR04
The Ultra Sonic HC-SR04 emits ultrasound at 40,000Hz that travels in the air. If there is an object or obstacle in its path, then it collides and bounces back to the Ultra Sonic module.
The formula distance = speed*time is used to calculate the distance.
Suppose, an object is placed at a distance of 10 cm away from the sensor, the speed of sound in air is 340 m/s or 0.034 cm/µs. It means the sound wave needs to travel in 294 µs. But the Echo pin double the distance (forward and bounce backward distance). So, to get the distance in cm multiply the received travel time value with echo pin by 0.034 and divide it by 2.
The distance between Ultra Sonic HC-SR04 and an object is:

Arduino IDE Code
***ARDUINO CODE****

#include <Mouse.h>
const int trigpin= 8;
const int echopin= 7;
long duration;
int distance;

void setup()
{
pinMode(trigpin,OUTPUT);
pinMode(echopin,INPUT);
Serial.begin(9600);
}

void loop()
{
digitalWrite(trigpin,HIGH);
delayMicroseconds(10);
digitalWrite(trigpin,LOW);
duration=pulseIn(echopin,HIGH);
distance = duration*0.034/2;
Serial.println(distance);
}
Code for Processing App
***PROCESSING CODE***

import processing.serial.*;
Serial myPort;
String data="" ;
PFont  myFont;
void setup()
{
size(1366,900); // size of processing window
background(0);// setting background color to black
myPort = new Serial(this, "COM3", 9600);
myPort.bufferUntil('\n');
}
void draw()
{
  background(0);
  textAlign(CENTER);
  fill(255);
  text(data,820,400);
  textSize(100);
  fill(#4B5DCE);
  text(" Distance : cm",450,400);
   noFill();
   stroke(#4B5DCE);
}
void serialEvent(Serial myPort)
{

  data=myPort.readStringUntil('\n');
}
Download Ardunio IDE from https://www.arduino.cc/
Download Processing App from https://processing.org/download
Thank you for reading, If you have reached so far, please like the article, It will encourage me to write more such articles. Do share your valuable suggestions, I appreciate your honest feedback!
