Table of Contents
In this article, you’ll learn how make a Push Button Control System for Light ON/OFF Push Button Control System for Light ON/OFF using Aurdino Uno.
Want to be able to just click a button and the light goes on? This project will take you through a step-by-step process in the development of a simple push-button control system where an LED will be operated with an Arduino Uno. It is a wonderful introduction to the great world of Arduino and electronics!
Hardware Needed:
- Arduino Uno
- Push Button
- LED
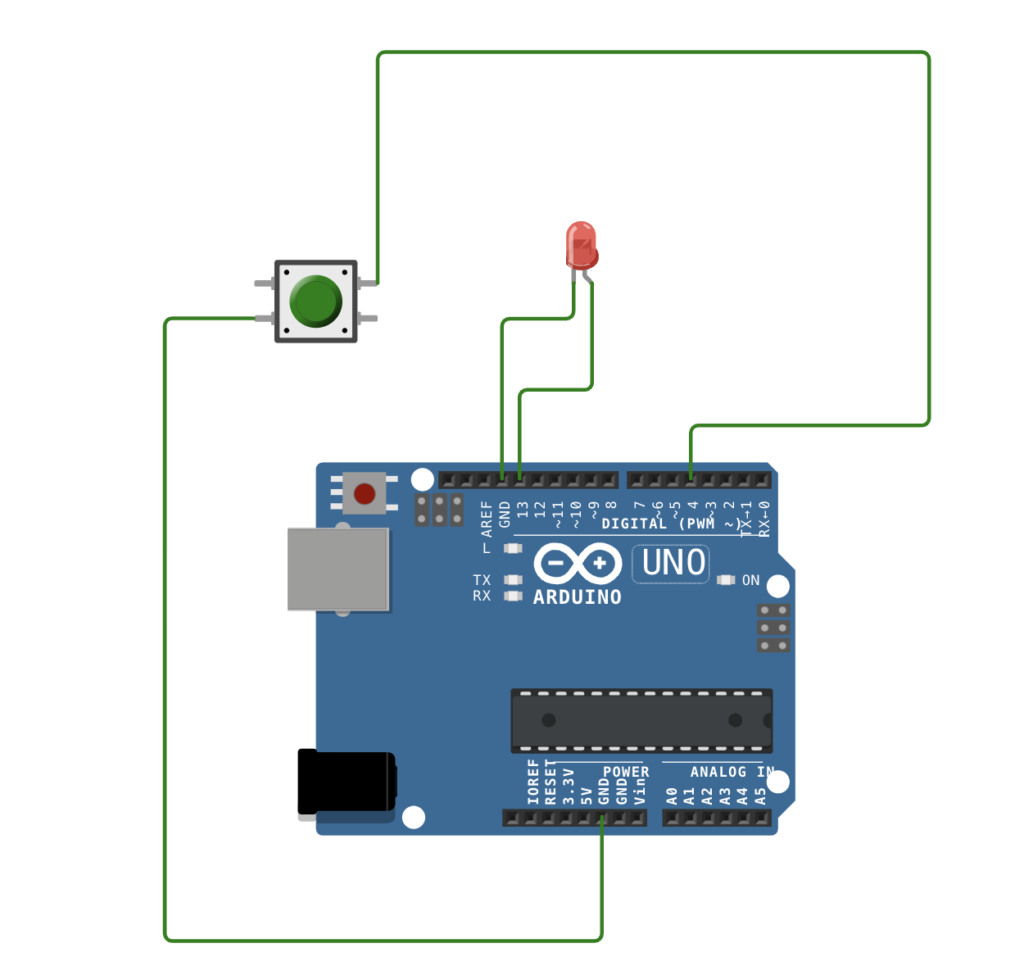
Schematics and hardware connections

Connect one terminal of push button to pin 4 and other to GND.
We are using Led as output when button is pressed, you can replace it with any required action you want.
Code
The Arduino code defines the functionality of the push button control system.
//Assigning the pins to variables
int led = 13;
int button_pin = 4;

// In setup() we set the button pin as a digital input and we activate the internal pull-up resistor using the INPUT_PULLUP macro, led pin as output and begin a serial communication between host and arduino to see the status.
void setup() {
pinMode(button_pin, INPUT_PULLUP);
pinMode(led, OUTPUT);
Serial.begin(9600);
}

void loop(){
// Read the value of the input. It can either be 1 or 0
int buttonValue = digitalRead(button_pin);
Serial.println(buttonValue);
if (buttonValue == LOW){
Serial.println(“button pressed”);
digitalWrite(led,HIGH);
}

else {
Serial.println(“button released”);
digitalWrite(led, LOW);
}
}
Code Explanation
The provided code controls an LED with a push button using an Arduino Uno and includes serial communication for monitoring the button state. Let’s understand each statement.
Variable Initialization:
int led = 13;: This line assigns the number 13 to the variableled. This represents the digital pin on the Arduino Uno connected to the LED.int button_pin = 4;: This line assigns the number 4 to the variablebutton_pin. This represents the digital pin connected to the push button.
Setup Function:
pinMode(button_pin, INPUT_PULLUP);: This line sets thebutton_pinas a digital input. TheINPUT_PULLUPmacro activates an internal pull-up resistor on the Arduino. This resistor ensures a constant HIGH signal when the button is not pressed, simplifying the code.pinMode(led, OUTPUT);: This line sets theledpin as a digital output, allowing the Arduino to control the LED’s state (on/off).Serial.begin(9600);: This line initiates serial communication between the Arduino and a computer (host) at a baud rate of 9600 bits per second. This allows you to see the button’s state on the computer software connected to the Arduino.
Loop Function:
int buttonValue = digitalRead(button_pin);: This line reads the current state of the button connected tobutton_pinand stores it in the variablebuttonValue. Due to the pull-up resistor,buttonValuewill be HIGH when the button is not pressed and LOW when pressed.Serial.println(buttonValue);: This line prints the value ofbuttonValue(either 1 or 0) to the serial monitor, allowing you to see the button’s state on the computer software.if (buttonValue == LOW) { ... } else { ... }: This is an if-else statement that checks the value ofbuttonValue.- If
buttonValueis LOW (meaning the button is pressed):Serial.println(“button pressed”);: This line prints “button pressed” to the serial monitor.digitalWrite(led, HIGH);: This line turns the LED on by setting theledpin to HIGH.
- Else (meaning the button is not pressed):
Serial.println(“button released”);: This line prints “button released” to the serial monitor.digitalWrite(led, LOW);: This line turns the LED off by setting theledpin to LOW.
- If