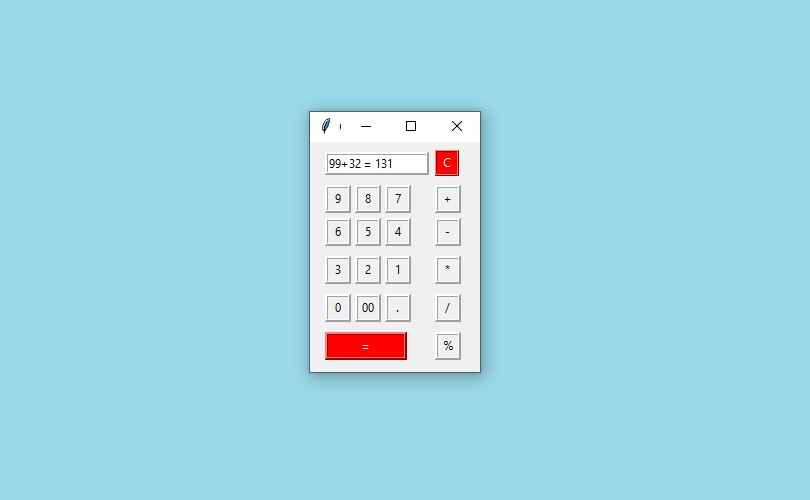
In this article, you’ll learn how to make a python program to create Python GUI Calculator Using Tkinter.
What is Tkinter
TKinter is widely used for developing GUI applications. Here Is the source for making a GUI calculator using python Tkinter library.
Let install tkinter module ,to install it open command prompt
pip install tkinterSource Code with Comment for Python GUI Calculator using Tkinter
#Importing tkinter library
import tkinter as tk
from tkinter import *
root = tk.Tk()
root.geometry("170x230")
root.title("Calculator")
root.maxsize(170,230)
root.minsize(170,230)
#Entry Widgets to show calculations
inp = Entry(root,width=16,borderwidth=3,relief=RIDGE)
inp.grid(pady=10,row=0,sticky="w",padx=15)
#  Button Operation code starts here..
def nine():
        inp.insert("end","9")
def eight():
        inp.insert("end","8")
def seven():
        inp.insert("end","7")
def six():
        inp.insert("end","6")
def five():
        inp.insert("end","5")
def four():
        inp.insert("end","4")
def three():
        inp.insert("end","3")
def two():
        inp.insert("end","2")
def one():
        inp.insert("end","1")
def zero():
        inp.insert("end","0")
def double_zero():
        inp.insert("end","00")
def dot():
        inp.insert("end",".")
def plus():
        inp.insert("end","+")
def minus():
        inp.insert("end","-")
def mul():
        inp.insert("end","*")
def divide():
        inp.insert("end","/")
def modulus():
        inp.insert("end","%")
def result():
        if inp.get() == "":
                inp.insert("end","error")
        elif inp.get()[0] == "0":
                inp.delete(0,"end")
                inp.insert("end","error")
        else:
                res = inp.get()
                res = eval(res)
                inp.insert("end"," = ")
                inp.insert("end",res)
def clear():
        inp.delete(0,"end")
#end code
# Button Design Code starts here..
clear = Button(root,text="C",width=2,command=clear,bg="red",fg="white",relief=RIDGE)
clear.grid(row=0,sticky="w",padx=125)
nine = Button(text="9",width=2,command=nine,borderwidth=3,relief=RIDGE)
nine.grid(row=1,sticky="w",padx=15)
eight = Button(text="8",width=2,command=eight,borderwidth=3,relief=RIDGE)
eight.grid(row=1,sticky="w",padx=45)
seven = Button(root,text="7",width=2,command=seven,borderwidth=3,relief=RIDGE)
seven.grid(row=1,sticky="w",padx=75)
plus = Button(root,text="+",width=2,command=plus,borderwidth=3,relief=RIDGE)
plus.grid(row=1,sticky="e",padx=125)
six = Button(text="6",width=2,command=six,borderwidth=3,relief=RIDGE)
six.grid(row=2,sticky="w",padx=15,pady=5)
five = Button(text="5",width=2,command=five,borderwidth=3,relief=RIDGE)
five.grid(row=2,sticky="w",padx=45,pady=5)
four = Button(root,text="4",width=2,command=four,borderwidth=3,relief=RIDGE)
four.grid(row=2,sticky="w",padx=75,pady=5)
minus = Button(root,text="-",width=2,command=minus,borderwidth=3,relief=RIDGE)
minus.grid(row=2,sticky="e",padx=125,pady=5)
three = Button(text="3",width=2,command=three,borderwidth=3,relief=RIDGE)
three.grid(row=3,sticky="w",padx=15,pady=5)
two = Button(text="2",width=2,command=two,borderwidth=3,relief=RIDGE)
two.grid(row=3,sticky="w",padx=45,pady=5)
one = Button(root,text="1",width=2,command=one,borderwidth=3,relief=RIDGE)
one.grid(row=3,sticky="w",padx=75,pady=5)
multiply = Button(root,text="*",width=2,command=mul,borderwidth=3,relief=RIDGE)
multiply.grid(row=3,sticky="e",padx=125,pady=5)
zero = Button(text="0",width=2,command=zero,borderwidth=3,relief=RIDGE)
zero.grid(row=4,sticky="w",padx=15,pady=5)
double_zero = Button(text="00",width=2,command=double_zero,borderwidth=3,relief=RIDGE)
double_zero.grid(row=4,sticky="w",padx=45,pady=5)
dot = Button(root,text=".",width=2,command=dot,borderwidth=3,relief=RIDGE)
dot.grid(row=4,sticky="w",padx=75,pady=5)
divide = Button(root,text="/",width=2,command=divide,borderwidth=3,relief=RIDGE)
divide.grid(row=4,sticky="e",padx=125,pady=5)
result = Button(root,text="=",width=10,command=result,bg="red",fg="white",borderwidth=3,relief=RIDGE)
result.grid(row=5,sticky="w",padx=15,pady=5)
modulus = Button(root,text="%",width=2,command=modulus,borderwidth=3,relief=RIDGE)
modulus.grid(row=5,sticky="e",padx=125,pady=5)
root.mainloop()
# end code
OUTPUT

So, here is our Python GUI Calculator. Simple isn’t it?? This is how we have successfully done with the ‘Python GUI Calculator using Tkinter’. I hope the Tkinter library is now more clear to you and don’t forget to try this code once!!
You can play around with the library, explore more features and even customize it further.
You can play around with the library, explore more features and even customize it further and Don’t forget to share with your friends.
ThankYou Pythoner’s!!! 🙂
Check out more python projects
- PYTHON ROCK PAPER SCISSORS GAME
- CURRENCY CONVERTER IN PYTHON
- COVID-19 TRACKER APPLICATION USING PYTHON
1 comment
Thanks man!
Comments are closed.